Before installing datacolor tools colour analysis software ensure the optimum computer configuration. Database should check and backup before installing the software. The installation program will prompt you to back up the data on the Datacolor TOOLS desktop before you proceed. We strongly recommend you do this to protect your unique color information. Please click the link to know the installation procedure of older version Datacolor Tools Software .
We are the largest Garment and Textile ERP software collector in Bangladesh. We sale customized ERP for the factories. We are agent of all Garment and Textile ERP software company. We will forward you to the best ERP software company based on your requirements. We are trouble shooter of fashion industrial software like Willcom, Barudan, Lectra, Gerber, iEcho, Datacolor, Shedomaster, Batch, Qc etc. Email: [email protected], Cell: +88 017 92 52 53 54
Requirements:
Components
Minimum Requirement
Recommended
Processor
Pentium 4 1.4 GHz
Pentium 4 2.5 GHz
RAM
1 Gigabyte
4 Gigabyte
Free Hard Drive Space
40 Gigabyte
120 Gigabyte
Resolution
1024 x 768 True Color
1280 x 1024 True Color
Monitor Size
19”
21” 16:9 widescreen
VGA
4 Megabyte
128 Megabyte
CD/DVD Rom
CD Reader
CD Writer
Diskette
1.44 Megabyte
1.44 Megabyte
Available Port
(1) RS-232 Serial (1) USB
(1) RS-232 Serial (3) USB
Printer Port
Parallel or USB
Parallel and USB
Operating System- OS
Windows® XP Pro, SP 2,
Windows XP Pro, SP 2, Windows Vista, Windows 7
E-mail Support
Outlook 2003 or above, POP3
Outlook 2003 or above, POP3
Database, supplied
Sybase 9.0.2. EBF 3924
Sybase 9.0.2. EBF 3924
Optional Database
Microsoft SQL Server 2005, Microsoft SQL Server 2008
Microsoft SQL Server 2005, Microsoft SQL Server 2008
Colour Analysis Software Installation Procedure:
At first click the Start button.
From the Start menu, choose and click Run.
In the Run dialog box, type D:/MENU and click OK. (If your CD drive is a letter other than D, use that letter in the dialog box.)
Then Click on the Install Datacolor TOOLS.
Select appropriate language and click OK.
Upgrading TOOLS. For upgrading from an earlier version of TOOLS you will see the following message
Then click Yes to continue the installation.
Or click No to stop the installation.
After the above question you will see the following message
Then click Yes for removing the older version and install the new version.
Or click No to stop the installation. The installation wizard will be aborted and the current TOOLS system will be preserved
Make your selection and click Next.
The installation wizard will open
Click Next to continue.
Now software license agreement will prompt.
Then click Yes after prompt of license agreement.
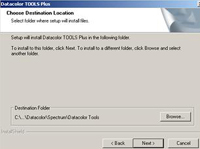
Select the folder where you want to install Colour Analysis Software.
Then click Next to accept the default location.
The program will prompt for a setup type:
SETUP TYPE SELECTION IS IMPORTANT! The most common choices are Textile Setup, and Paint Plastic Ink Setup. These refer to the types of materials you use.
Make a setup selection and click Next.
Now select the components of Colour Analysis Software that you want to install.
The optional program features of datacolor tools that you can choose to install on the system include:
Form Editor. This is a separate program that allows you to customize Datacolor TOOLS forms. The default selection places a check in this box and automatically installs the Form Editor program. We strongly suggest that you install this program. If you do not and decide to use it later, you must repeat the entire program installation to install it. This option is not available with Datacolor TOOLS or TOOLS
Database Conversion. This is a program that converts data stored using ColorTOOLS1.3.x (Paradox format database) to Sybase format, which allows you to continue using the data with Datacolor TOOLS.
To continue with the installation you must click Yes. This will delete all data from the TOOLS desktop.
Click No to stop the installation. Launch the existing version of Datacolor TOOLS and save the desktop data to the database. You can then install the program update.
Click next button from the software
If you are upgrading from Color Tools, or Datacolor TOOLS version running under Sybase 6.x or 7.x, the program will also prompt you to upgrade the database.
To perform this upgrade during the installation, place a check in the box and click Finish.
The program will continue the installation. Below is the final installation screen
The installation is now complete.
Click Finish. To run Datacolor TOOLS, you must restart the system. After you have restarted the system, launch Datacolor TOOLS immediately.
UpdateSpectrophotometer Calibration Tools:
When you are updating Spectrophotometer Calibration Tools, please consider the following:
Database Updates. Updating the database software is a separate function from upgrading/rebuilding the database itself. An existing database generated under Sybase v.7 will run under Sybase v.9, but it may degrade the database access speed. We recommend that an update to Sybase 9 program software should always include the step to Upgrade/Rebuild the Database. This upgrades the Sybase database structure from v.7 to v.9 format. This option can be accessed from the Datacolor TOOLS installation menu or the Sybase installation menu.
License for Calibration Software:
This number is provided by Datacolor calibration software and can be obtained one of three ways:
Direct web connection: If you have internet access, you can use the link provided in the Datacolor Security Client window. This procedure is documented in the Licensing Procedure section of this guide of calibration software.
Email: For each product, send the Serial Number found on the CD case, and Computer Validation Number found on the Datacolor Security Client window, to [email protected]>. You will receive an Unlock Response Number via e-mail. You must enter this into the Datacolor Security Clientwindow.
Questionaries of Datacolor Tools:
Where is you Datacolor tools database located?
On computer on the local network
Every computer has its own Datacolor Tools installation and database
We use x-rite IQC
What operating system does the computer that holds the Datacolor Tools database have?
Microsoft Windows XP (SP2 required, SP3 preferred)
Microsoft Windows Vista or 7 (SP1 preferred)
Microsoft Windows 7
What version of the operating system do you have installed? (only applies to Windows Vista and 7)
32bit
64bit
Can the computer that holds the Datacolor Tools database access internet thru a web browser?
Yes
No
Is a proxy used for accessing Internet?
Yes
No
What language does the computer that holds the Datacolor Tools database use?
English
Chinese (simplified / traditional; please underline)
Mandarin
Other:_________
Is the computer that holds the Datacolor tools database always online?
Yes – always
Only during opening hours
Only when used.
How is the computer that holds the Datacolor Tools database use connected to the internet?
Via LAN
Via Dial-up
Not connected
How many computers are connected to the Datacolor Tools Database?
1
2-5
5-10
11 or more
Is the database backed up?
Yes
No
Don’t know
Do you have a firewall installed?
Yes
No
How many computers do you use for measuring production lots for the CAP retailer?
1
More: ___
What version of Datacolor Tools or IQC do you use?
__datacolor Tools version- 2.0.1
Brief infrmation in connection with the natific M3K installation:
-natific M3K uses Microsoft .NET Framework 2.0. Please make sure this is installed before the M3K installation. No other versions of the framework are suitable, only the exact 2.0 version (SP2 is available for .NET 2.0)
-If you use Datacolor Tools, please empty the Tools desktop. You should store the measurements there into the database or export them into a QTX for the time of the installation.
-natific M3K needs access to the following servers:
m3k.coloraccreditation.com
asap.natific.com
-Please note, that in case you use Datacolor Tools on multiple machine for the CAP retailer, we need to install the CAP form to every of those computers. natific M3K should be installed only on one.
-If you use x-rite IQC on multiple machines for the CAP retailer, we will need to install the eJob template and natific M3K on each computer.
-You are obliged to enter the following additional information during the measurement:
FabricID / YarnID
Machine name
Machine port (depends on protocol type)
Sample Position (depends on protocol type)
Total length (depends on protocol type)
LOT number
Submission Type (Lab Dyeing; Approved Lab Dyeing; Production Sample Dyeing; First Approved Bulk Lot; Production; Scale-up sample; VCS – Virtual Color Submission)
Telephone: Finally you make telephone call for getting license of datacolor tools colour analysis calibration software.
In this case study it is suggested to introduce teletalk 3g coverage and then expand it with demand from the customer side and availability of fund from the government. As a pilot project, in this study a sample calculation has been made considering only the Gulshan and Banani area being migrated to 3G. According to TRX calculation, 1 TRX = combined BCCH and SDCH that makes 7 TCH channels. 2 TRX = 1 BCCH and 1 SDCH that makes 14 traffic channels (TCH). 3 TRX = 1 BCCH and 2 SDCH that makes 21 traffic channels (TCH). Erlang value has been taken from Erlang Table according to GOS = 0.020. Table below shows existing BSS configuration
This table of Teletalk network shows existing BTS configuration.
BTS Name
Configuration (900+1800)
GSM+ WCDMA
TrafficChannels
TrafficErlang /Sector
TotalErlang
Gulshan 2/ S Ho.
2/2/2+1/1/1
14*3+7*3
8.20*3+2.93*3
24.6E+8.79E
33.39E
Gulshan BTTB
2/2/2+2/2/2
14*3+14*3
8.20*3+8.20*3
24.6E+24.6E
49.2E
Gulshan Rd 35
2/2/2+1/1/1
14*3+7*3
8.20*3+2.93*3
24.6E+8.79E
33.39E
Gulshan Road 55
2/2/2
14*3
8.20*3
24.6E
24.6E
Gulshan Road 107
1/1/1+3/3/3
7*3+21*3
2.93*3+14.03*3
8.79E+42.09E
50.88E
Gulshan Rd 116
2/2/2+1/1/1
14*3+7*3
8.20*3+2.93*3
24.6E+8.79E
33.39E
Kakoli
2/2/2+2/2/2
14*3+14*3
8.20*3+8.20*3
24.6E+24.6E
49.2E
Teletalk (Banani)
2/2/2
14*3
8.20*3
24.6E
24.6E
Banani Rd 5
2/2/2+1/1/1
14*3+7*3
8.20*3+2.93*3
24.6E+8.79E
33.39E
Banani Rd 18
2/2/2+1/1/1
14*3+7*3
8.20*3+2.93*3
24.6E+8.79E
33.39E
Banani Rd 19/A
2/2/2+2/2/2
14*3+14*3
8.20*3+8.20*3
24.6E+24.6E
49.2E
DOHS Baridhara
2/2/2
14*3
8.20*3
24.6E
24.6E
Baridhara Rd 2D
1/1/1
7*3
2.93*3
8.79E
8.79E
Baridhara Rd 13
2/2/2
14*3
8.20*3
24.6E
24.6E
Karail
2/2/2
14*3
8.20*3
24.6E
24.6E
15 BTS
126 TRX
882 Traffic Channels
497.22E
The following parameter can be considered –
GoS = 0.020
No of BTS = 15
Cell = 72
Total Erlang = 497.22E
TRX = 126
Traffic Channels = 882
Total subscriber that can be catered considering 20 mErlang/subscriber during Busy Hour = 497.22 / 0.020 = 24861 subscribers
Mapping GSM Capacity and Teletalk 3G Coverage:
The planned network has been designed with both GSM and WCDMA technology working simultaneously. GSM band is applicable for GSM BTS and WCDMA band is applicable for 3G NodeB. Existing GSM supported BTS will remain same. Grade of service (GOS) of 0.020 for GSM and 0.015 for 3G has been calculated. After analysis it is found that 20 BTS will be required instead of 15 BTS [6]. In 3G there are 36 channels per cell and 108 channels per site has been considered. Below BTS/ NodeB configuration has been shown both for GSM and WCDMA system that is generic configuration. The configuration may change according to drive test and subscriber density. The coverage of umts sim or wcdma sim is different than gsm sim.
Table: – Teletalk Migrated BTS configuration.
BTS+ NodeB Area
TRXConfiguration 900M+1800+ WCDMA
TrafficChannels900M+1800M+ WCDMA
Erlang900M+1800M+ WCDMA
Erlang900M+1800M+ WCDMA
Gulshan
1/1/1 +1/1/1 +1/1/1
7*3+7*3 +36*3
2.93*3+2.93*3+ 26.43*3
8.79E +8.79E + 79.29E
Gulshan
2/2/2+ 1/1/1 +1/1/1
14*3+7*3+36*3
8.20*3+ 2.93*3+26.43*3
24.6E +8.79E + 79.29E
Gulshan
1/1/1 +1/1/1 +1/1/1
7*3+7*3 +36*3
2.93*3+2.93*3+ 26.43*3
8.79E + 8.79E +79.29E
Gulshan
2/2/2 +1/1/1 +1/1/1
14*3+7*3+36*3
8.20*3+ 2.93*3+26.43*3
24.6E +8.79E + 79.29E
Gulshan
1/1/1 +1/1/1 +1/1/1
7*3+7*3 +36*3
2.93*3+ 2.93*3+26.43*3
8.79E +8.79E + 79.29E
Gulshan
2/2/2 +1/1/1 +1/1/1
14*3+7*3+36*3
8.20*3+2.93*3+ 26.43*3
24.6E + 8.79E +79.29E
Gulshan
1/1/1 +1/1/1 +1/1/1
7*3+7*3 +36*3
2.93*3+2.93*3+ 26.43*3
8.79E +8.79E +79.29E
Gulshan
1/1/1 +1/1/1 +1/1/1
7*3+7*3 +36*3
2.93*3+ 2.93*3+26.43*3
8.79E +8.79E +79.29E
Bonani
2/2/2 +1/1/1 +1/1/1
14*3+7*3+36*3
8.20*3+ 2.93*3+26.43*3
24.6E + 8.79E +79.29E
Bonani
1/1/1 +1/1/1 +1/1/1
7*3+7*3 +36*3
2.93*3 +2.93*3+26.43*3
8.79E +8.79E + 79.29E
Bonani
2/2/2 +1/1/1 +1/1/1
14*3+7*3 +36*3
8.20*3 +2.93*3+26.43*3
24.6E +8.79E + 79.29E
Bonani
1/1/1 +1/1/1 +1/1/1
7*3+7*3 +36*3
2.93*3 +2.93*3+26.43*3
8.79E +8.79E + 79.29E
Bonani
2/2/2 +1/1/1 +1/1/1
14*3+7*3 +36*3
8.20*3 +2.93*3+26.43*3
24.6E +8.79E + 79.29E
Bonani
1/1/1 +1/1/1 +1/1/1
7*3+7*3 +36*3
2.93*3 +2.93*3+26.43*3
8.79E +8.79E +79.29E
Bonani
1/1/1 +1/1/1
7*3 +36*3
2.93*3 +26.43*3
8.79E + 79.29E
Baridhara
2/2/2 +1/1/1
14*3 +36*3
8.20*3 +26.43*3
24.6E + 79.29E
Baridhara
1/1/1 +1/1/1
7*3 +36*3
2.93*3 +26.43*3
8.79E + 79.29E
Baridhara
1/1/1 +1/1/1
7*3 +36*3
2.93*3 +26.43*3
8.79E + 79.29E
Baridhara
1/1/1 +1/1/1
7*3 +36*3
2.93*3 +26.43*3
8.79E + 79.29E
Baridhara
1/1/1 +1/1/1
7*3 +36*3
2.93*3 +26.43*3
8.79E + 79.29E
20 Site
102+60 Cell123+60 TRX
861+2160 Channels Traffic
409.5 E +1585.8 E = 1995.3E
E = Erlang, M = MHz
The following parameter can be considered –
GOS = 0.020 for GSM and 0.015 for 3G
Total TRX GSM 123 + WCDMA 60 = 183 TRX
Total BTS = GSM BTS 20 + 3G NodeB 20 = 40
Total Cell = GSM 102+ 3G 60 = 162
Total Erlang = 409.5+1585.8 E = 1995.3E
Subscriber at a time in GSM = 409.5 / 0.020 = 20475 subscribers.
Subscriber at a time in 3G 1585.8/0.015 = 105720 subscribers
Total subscribers in dual network 20475 + 105720 = 126195 subscribers
UMTS Router:
This is new technology of cellular mobile system. UMTS router is a special router for its internal networking system.
UMTS Router
One UMTS router can cover a lot of host. WCDMA sim and UMTS SIM is mandatory for the router system.
Teletalk is only govt. organization of Bangladesh who provide a lot of teletalk 3g packages.Teletalk offer many package for their subscribers. Teletalk developing their services day by day. They provide 3G high speed internet services. Teletalk 3g packages are listed below-
Teletalk Bornomala Package
Teletalk Youth Package
Teletalk Teletune Package
Teletalk Agami Package
Teletalk Ekush Package
Teletalk Bijoy Package
Teletalk Standard Package
Teletalk Shadheen Package
Teletalk Shapla Package
Please visit Teletalk official site to know more Teletalk
Teletalk 3g Services:
The Teletalk 3G services are offering its subscribers are:
Video on demand
Game on demand
Video telephone will be possible after migration.
Tele-shopping
Tele-banking financial services
Database Access Information service
Internet service
Tele Medicine
Remote Learning,
Mobile TV
Teletalk WCDMA Architecture :
Teletalk WCDMA architecture is the standard modulation technique for 3G Radio Access Network. WCDMA architecture technique is appropriate for migration from Global System for Mobile Communications (GSM)/ General Packet Radio Service (GPRS) to Third Generation (3G).
WCDMA Architecture
According to following diagram Teletalk has the choice to slowly evolve along a migration path toward the original objectives of 3G to obtain the smoothest possible transition from the 2nd to the 3rd generation of mobile communications [4]. The cell parameters of 3G are
Radius = several kilometers (according to Antenna NodeB parameter set)
Transfer rate = 384 kbit/s
Mobility = 120 km/h or high 500 km/h
GSM Positioning of Teletalk:
The second generation of cellular services (2G) of Teletalk Bangladesh Limited as characterized by the GSM standard is a TDM-based technology. GSM run over Plysynchronization Channel (PDH)/Synchronization Channel (SDH) access networks, relying on a wide variety of wire line and wireless transport solutions. The present positioning of Teletalk in GSM evolution path is shown in below figure-
Teletalk GSM Phase
General Packet Radio Service (GPRS):
The relatively new 2.5G (GPRS) data service is still very much a TDM-based technology, providing an interim solution.
Existing GSM/GPRS Network Architecture:
Existing network architecture represents the mobile network components. They consist of BTS, BSC, MSC, TRAU, HLR, VLR, AC, and Equipment Identification Register (EIR). Figure below shows the present network architecture.
For an ARFCN of 556 the respective uplink and downlink frequencies can be calculated as follows:
Teletalk uplink fu(n) = 1710.2+ (n-512) * 0.2 MHz
= 1710.2 +(556-512) * 0.2 MHz
= 1710.2 + 44*0.2 MHz
= 1710.2 + 8.8 MHz
= 1719 MHz
Teletalk downlink fd(n) = fu(n) + 45 MHz
= 1719 + 45 MHz = 1764 MHz
Frequency Reuse: Teletalk normally use 4*3 reuse patterns for both 900 MHz & 1800 MHz frequency band. Teletalk use tri sector antenna with 120 degree coverage/sector.
Pay Back Period After Implementing UMTS Architecture:
Pay back period after implementing UMTS architecture is the length of time required to recover the cost of an investment calculated as Investment/Annual cash flow. In 3G revenue has been 0.5 Taka per Erlang. As a result 3G need 11 months for returning the investment based on only equipment cost where no administrative and others cost is calculated here.
Investment cost =156810820Taka.
Erlang = 1585.8 E
Revenue / Minute (Busy Hour) = 1585.8 Taka (Without tariff as 0.5 Taka / Minute)
Revenue / Hour (Busy Hour) = 792*60 = 47550 Taka.
Revenue / Day = 47550/0.1 = 475500 Taka.
Total Revenue/ Month = 475500*30 = 14265000 Taka.
Payback Period = Investment/monthly income
=156810820 /14265000
= 11 Months (Equipment Cost)
Recommendation of UMTS Architecture:
From this study it is clearly understood that UMTS architecture is very much cost-effective from Teletalk’s perspective. It is to be mentioned that cost-justification is shown here using a pilot project. With increasing capacity the cost will come down further. Only thing that is to be assured the demand for such services are there and subscribers are capable of availing them. Moreover, it will give Teletalk some competitive advantage over other operators. At the same time, it will also be able to satisfy customers’ demand which should be any operator’s prime goal.
Considering all these issues the following recommendations can be made:
Teletalk should immediately start preparing a business plan regarding 3G.
The strategies should be clear and specific. It’s better to start 3G services on an island basis which should be expanded through-out the country in phases depending on the customer demand and capacity of the customer to avail this service
Acknowledgments :
I would like to express thanks to Mr. All Mamun, Asst Manager, IT and Billing, Dhaka Phone. Many thanks for Mr. Mostafiz, Asst. Manager Network Operation, Teletalk Bangladesh Ltd. for the information he provided regarding the Base Station Subsystem of Teletalk Bangladesh Limited. I acknowledge the help extended by the officers and officials of Teletalk Bangladesh Ltd. for the information they have supplied, without which this thesis would have lost all its merits. Special thanks for Mr. Mohammad Tawrit, Adjunct Faculty, UITS and DGM, Network & Operation, Teletalk Bangladesh Ltd. for his valuable advice, supervision and input. Specially he has taught me the basic and professional skill about Telecommunication Network for implementing teletalk 3G cellular mobile system.
Program : M.Sc. in Telecommunication
Cell Number: +880 17 92 52 53 54
==========
Change Log
ou may also check your last 5 payments for postpaid, please dial *123*1*6# (free
Alternatively, you may also send e-mail at [email protected] any kind of corporate connection related assistance/issue
We have found that currently you are a Diamond Elite user.
We need to arrange different instrument to make a complete cctv installation. AT first the motherboard of DVR should be mounting in casing. After that hard disk need to install, after that the DVD writer should be install. After installing DVD writer connect all internal cable connection insight the DVR unit. After assembling the whole system the power button need to switch on. After running the DVR system the software should be configured. After configuring the software anybody can access the DVR from Lan/Wan with the help of Internet browsers. Opera, Firefox, Google chrome are the very nice browser to access the system.
How to Install CCTV Camera – Hard Drive:
Generally DVR support 4 SATA hard disk or support 3 SATA hard disk with DVD writer. Use the good hard disk for security and safe. Please calculate Hard Disk capacity based on requirement of recording setting.
HDD Installation
First unscrew and open the top cover of the system
After that setup the power and data cables.
Install the hard disk onto the bottom casing.
Finally screw the hard disk
How to Install CCTV Camera – DVD Writer:
The writer should be compatible with other devices. DVD writer is installed only for backup
At first unscrew and open the top cover of the system
Setting the power cable and data cables.
Than install the DVD writer into bottom of the case
Finally mount the DVD writer.
DVD Rom Installation
Single DVR Security Camera Installation:
Please ensure all hardware of CCTV systems is available.
Assemble DVR unit
Make sure the power of 16 cameras.
A VGA monitor or Television
A lot of cat5 / cat6 network cable for connecting to a computer
Connect all cameras with DVR unit with monitor
Switch on the DVR system
Set default system menu.
Format the Hard Disk
Set the values of the menu based on optimum requirement.
DVR Installation
Power Installation:
Set proper voltage from power source.
Please don’t share same power line with outer equipment’s.
Please switch on the remote controller of the system
Press the POWER button from the front panel of DVR
Uninterrupted power supply and backup power source is mandatory.
Power Installation
Camera Installation – Contrast / Brightness:
First click in INPUT button of CAMERA software menu.
Set the contrast and brightness according to requirments.
Adjust the brightness and contrast with the help of sliders
To return the main menu click exit button
To return to VIDEO Enhance, Click the EXIT
Security Camera Installation – IP:
There are two kinds of IP setup option in DVR. One is DYNAMIC IP and others one is STATIC-IP option
Dynamic receives IP address automatically from its protocol.
Dynamic address need not to setup GATEWAY ADDRESS, SUBNET MASK and IP ADDRESS.
Static address need customized IP
It require GATEWAY ADDRESS, SUBNET MASK and IP ADDRESS.
Port Configuration:
Port is special type of TCP address of network protocol.
Port can be set from 1 to 65535.
Click the port button after that a text box will show up.
Delete the default port number
Set the required port number
Click OK after setting port number
Security Camera Installation – Camera Connection:
Make sure BNC connector is available
Make sure coaxial cable is available
Make sue jointer is available
Make sure cable type is available
Make sure wire pipe is available. The wire pipe protect the cable well
Connect the cameras into the Video Input button located in the back side of DVR
Use BNC connector to connect the coaxial cable with DVR
CCTV Network
Security Camera Installation Cost:
Some organization offer very low cost to setup the cctv system. Highest cost does not provide hight quality always. The specifications of security camera installation should check carefully before installing it.
The screw press dewatering machine is integrating with auto-control cabinet, sludge thickening & dewatering body liquid collection tank. Therefore, the high efficiency flocculation, continuous sludge concentration, dewatering and filtrate collection can be automatically completed all-in-one, the collected liquid will be reflux or emissions finally.
Application of Dewatering Screw Press:
Dewatering screw press is used for municipal sewage petro-refining, leather making, printing and dyeing paper, coalification dressing, biochemical biochemical pharmacy, steel pickling and chemical sugar, food processing etc.
Dewatering Screw Press
Advantages of Screw type Activated Sludge Treatment:
Low operation cost: below 30% of belt press and 10% of centrifuge.
Power saving: less than 6% of centrifuge required for activated sludge treatment process
Water-saving: less than 0.1 % of belt filter press.
Saving-drugs saving around 60%.
Compact: saving more than 60% of the investment for dehydration room.
Non clogging: handling the fiber sludge perfectly for activated sludge treatment process.
Features of Screw Dewatering:
Very simple processing,
Very low investment in system,
Energy efficient for dewatering
Activated sludge treatment
System can be programmed to make the operation more convenient and accurate
Different flocculating that make sludge dewatering easier
Uniform and accurate dispensing, saving costs
Flowchart of Dewatering Screw Press:
The process of dewatering screw press –
Flowchart of Dewatering
Soleenoid valve
Dry powder
Elec-control box
Polymer flocculants
Gutter
Design pump
Measuring tank
Flocculation tank
Again Elec-control box
Filterate
Screw Conveyor
Sludge thickner
Equipment of Screw Press Dewatering:
The equipment’s of screw press dewatering are listed below –
Counter seizing grate cleaner
Spiral screen
Circulation toothed harrow mid cleaner
Dosing system
Spiral conveyer
Sand separation
Solution preparation system
Sludge Treatment and Disposal Process:
When the machine starts running, the activated sludge tank treatment and disposal system is pushed into the filter cartridge from the feed inlet and then transfer to the sludge cake passage under the pushing of the helical axis blades. Because the gaps among the helical axis blades will gradually getting narrower, the sludge is undering heavier pressure. After that the water slowly comes from it as a result of burden differential and issues from the filtering space between the fixed plates and the moving plates. Trusting on the self cleaning functionalities of the stable plates as well as the moving plates block can be well avoided. At the end, the sludge treatment and disposal cakes are pushed by helical axis after being completely dewatered and then discharged from the outlet.
ETP Wastage Management Policy:
Applicable for:This policy is applicable for all the units of Auto Group.
Objective: The objective of this policy is to ensure proper management or disposal of wastages
Basis: To maintain clean and tidy workplace organizations need to properly manage its wastages and get rid of those. As Auto Group produces readymade garments, it produces lots of fabric wastages and worn out machine parts which required to be disposed properly. To address this issue and establishing a formal written guideline this policy has been formulated.
Policy: In broad category the wastages are classified in 4 categories which are –
Scrap fabrics & accessories wastage
Sludge from ETP
Soled waste
Defective products
The wastages which are sellable must be sold to the buyers based on bidding and that amount should be contributed to the Worker Welfare Fund. In case of hazardous and toxic wastages, proper disposing procedures will be followed to ensure health safety. Workers should be given training so that the rate of fabric wastages and defective products are lowered.
Regulations & Procedures: In case of disposing scrap fabrics and accessories wastages the steps which should be followed are as bellows –
Production department will gather the fabric and accessories wastages
Items should be weighed and chart should be maintained based on their categories and quantities.
Operation department will arrange bidding for the potential buyers and sale the wastages to the highest bidder and the amount should be contributed to the Welfare Fund (WF).
ETP sludge disposal –
The sludge which is being produced from ETP should be gathered and stored properly in containers or barrels.
These containers should be stored in a separate storage area rather than the places which are being used for storing other kinds of wastages.
Sludge should be taken away by government for treatment and landfilling.
Regulations and procedures for dealing solid wastes are –
Tube lights, electric item wastes will be charted and kept in separate area for disposal. These items should be returned to suppliers for recycling.
Worn out machine parts will also be gathered all together then charted and stored properly. These items should be sold to the scrap metal purchasers or to light engineering workshops (Dholaikhal).
Paper and wood wastes will be shredded and stacked. These will be given away to concerned parties for recycling.
Plastic items, office items should also be weighed and stored and later sold to recycling agencies.
Regulations and procedures regarding defective products –
In case of having defective products (garments) the labels should be removed at the first place, then those will be charted and contained.
Merchandisers will try to bring foreign stock lot buyers for buying the defective garments or those will be sold to local market for domestic consumption
Responsible Parties: Management will be responsible for deciding selling off the defective garments.
Merchandisers will be responsible for getting foreign stock lot buyers
Admin department will be responsible for storing wastages properly.
Operation department will be responsible for getting buyers and selling wastages
CSO will ensure security while selling wastage items
Communication & Implementation: The policies are to be communicated to all levels of management through regular and repeated discussions during meetings and implemented and followed up on accordingly.
The policy is to be published in the policy book, so it will be visible to all the employees. A Bangla version of the policy will be provided to the junior factory level staffs and workers.
Exceptions: Exceptions must have the prior approval of MD or management.
Feedback & Control: Factory heads will check whether all the wastages are properly being collected and stored. Also he will ensure transparency was maintained in the whole wastage disposal procedure.
Principal of Dewatering Screw Press:
The filter main part is formed by screw axis with fixing and moving plates overlapping. It dewaters adequately by the gravity and the power from back pressure plate during the process of propagation, the filter comes out form the space between fixing and moving plates, the sludge cake discharged from the discharged outlet.
Application of Dewatering
Rational model should be selected according to technical parameters


